
Custom Binder Artwork Tips
Using InDesign Variable Text On Custom Binders
Jul
SpeedBinder uses Adobe InDesign to set up the variable text graphics on custom binder artwork. Variable text means that certain text elements change from one custom binder to the next, such as names or numbers. InDesign calls this feature “data merge”.
We do variable text custom binder projects for athletic teams, presentation binders for proposals, and training program binders. These custom binder applications all have one thing in common: The text printed on the binder changes from one binder to the next.
In this article, we step through the workflow we use in order to set up the print files for these projects. The tools used are Adobe InDesign, Adobe Illustrator, and Google Sheets. (Excel works fine, too.)
This is a long article, and we go through a lot of setup before getting to the actual InDesign variable text stuff. If you want to skip all the setup information and go right to InDesign data merge, jump ahead to the good stuff here.
Getting Started – Find The Correct Template
As with any custom binder project, we start with the correct template file. You can find template files for all of our custom binder styles and sizes here. We also list template files for each product on the individual product pages, such as our Full Color Vinyl Binders With Variable Copy here.
For our purposes in this article, we will be using a 2″ full color vinyl binder being used for team playbooks. Each player will be given their own, unique binder. The basic binder template looks like this:
We offer these templates in both InDesign and Illustrator formats. It doesn’t matter which program you use at this stage. Use which ever one you are more comfortable with.
Establish Your Background Artwork
The graphics on your binder break down into two sections: The common area (or background), and the variable text (or foreground). Do your background graphics first. In our example, the background artwork looks like this:

Note that even though this is the background, we included placeholder text showing where the names will be added later. This is just to verify design and placement.
Also note that it doesn’t make any difference what program you use to create the background. We have customers who use Photoshop, Corel Draw, Illustrator, InDesign…any program is fine. If you use something that is not inside the Adobe Creative Suite, though, be sure to save out two PDF copies. The first, with placeholder text included, and the second, with the placeholder text removed. That will allow us to work with it downstream.
Preparing Your Variable Text
We need to load the copy that will be fed into the InDesign data merge feature into a spreadsheet. We use Google Sheets for this, but you can also use Microsoft Excel. Whichever program you use, you need to save out the list as a “comma separated file” for eventual importing into InDesign.
Our example spreadsheet looks like this. Note that we have two columns, and a header in row number one:

We then save the spreadsheet as a comma separated file in order to eventually load it into InDesign:

If You Want, You Can Stop Here
At this point, if you like, you can stop and we will take over. Send us your background file(s). Use the “Package” function in either InDesign or Illustrator. Send us your comma-separated list of names, and we will do the rest. (We’ll always send a proof, so you will be able to verify that nothing was lost in translation.)
Getting Ready For Variable Text – Creating Intermediate PDF Files
Start by creating three PDF background files: One each for the front, back and spine. We start by going to the Illustrator file we created earlier, and making visible the “Entrapment Insert Layer”. Make sure that layer, and the “Customer Artwork Layer” are unlocked:

Drag the Illustrator Selection Tool to select the front cover Entrapment Insert Area and all of your front cover graphics:

Copy the selection to the clipboard, create a new (blank) file, then paste the selection into the new file. Don’t worry about the artboard size for the new file. We’ll set that in a moment. Make sure the file is set to CMYK color mode, and make sure the document raster effects are set to “High”:

After you create the file and paste the clipboard contents, it will look something like this. You will have to either zoom in, or zoom out, depending on the size of the artboard you created when you created the file:

The semi-transparent rectangle establishing the size of the printed insert will be on top. Use the Artboard tool to change the artboard size to match the size of that rectangle, like this:

We don’t need that semi-transparent rectangle any more, so go ahead and delete it. Next save your file (in PDF format) twice: First, with the placeholder text in place, then with the placeholder text deleted. Use these settings on the Illustrator “Save As PDF” tool for both files. The critical part is to have Trim Marks turned on, and at least 0.125″ of bleed:

Using InDesign Data Merge To Create Variable Text
We now (finally!) move to InDesign to merge the text to the background image. We’re describing this process in terms of how we create printable files to run into our printing workflow, so from here out the discussion is process-specific.
The digital press we use for these projects prints on 13″ x 19″ sheets. Since our binder design includes variable text on the front cover and the spine, we will create a “press sheet” that contains both. This will turn into the actual print file we send to production. Start by creating a new InDesign document with the correct dimensions:

With your file open, find the InDesign “Layers” panel, and set up three layers:
- Variable Text
- Background Files – For Print
- Background Files – With Placeholder Text

Next, find the InDesign “Pages” panel, then double-click on the “A-Master” icon.

You are now editing the “Master” page, which you can think of as the background for all the other pages. We now want to place the background PDF files created previously using the File->Place menu option.
Position Your Background Images
We created two versions of the background files: With and without placeholder text. Make sure you put them in the correct layers defined above. The purpose of the placeholder text is to ensure that the text we add using the InDesign variable text feature is correctly positioned and formatted.

We start with the “placeholder text” layer, and place the two files. We align them vertically, then position them roughly in the center of the artboard, like this:

Note that those files were placed in the “placeholder text” layer. Next we select both of those files, copy them to the clipboard, select the “for print” layer from the layers panel, then paste them in place. Replace the “placeholder text” versions of the background files with the “for print” versions. The easiest way to do that is to select them one at a time, the execute the file->place command. When you select the appropriate file for placing, it will automatically replace the selected file.
When you are done, your file will look like this. We’ve expanded the layers pallet. Note the various files and their corresponding position. Also note that what is now visible is the “for print” versions of the background PDFs, since they are contained in a higher layer than the “placeholder text” version:

Adding The InDesign Variable Text / Data Merge Placeholders
Lock both background layers. Hide the “for print” layer, and select the “variable text” layer. Also, make sure after all this you are still editing the “A-Master” page. Use the text tool to create a text object in the correct position, then format it (typeface, alignment, color, effects, etc) as necessary. For the moment, we are showing the added text in black for clarity. We’ll change it to the correct color later:

This is why we created the “placeholder text” versions of the background PDFs. They allow us to precisely align the variable text objects. Here’s what it looks like with the InDesign variable text object slightly misaligned:

Repeat that process for all variable text elements in your design.
InDesign Data Merge
The InDesign data merge function will create a new page in your file for each entry in the data source (your spreadsheet). The InDesign data merge panel can be accessed here:

When you open the data merge panel, InDesign lists some instructions. There is a three step process:
- Select your data source (your comma separated spreadsheet file)
- Connect the data from the spreadsheet to the document
- Create the merged file
All the action happens inside the panel menu, which we have highlighted.

Click on the panel menu, and navigate to the “Select Data Source” option:

Load You Spreadsheet
Navigate to your spreadsheet, select it, and load it into InDesign. The data merge panel will now look like this:

Next, we need to “connect” the data in the spreadsheet to the specific text objects in the InDesign file.
Start by using the text tool to select the first text element you want to connect to the spreadsheet:

Then, with that text selected, click on the field name (the column name from your spreadsheet) in the data merge pallet:

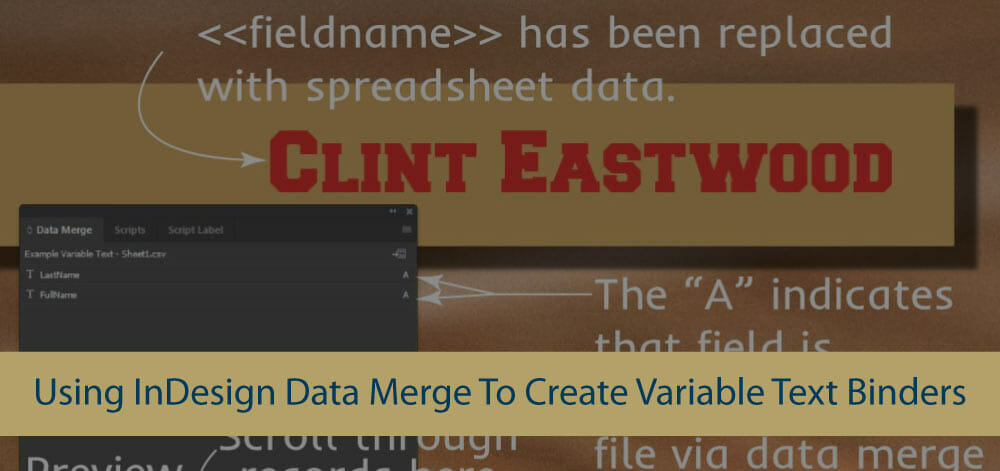
InDesign will then replace your selected text in the format of “<<Fieldname>>”.
(A bit of a nit here: The font we are using in this example does not include “>” or “<” characters. So the screenshots will show little squares. Assuming your font includes those characters, you will see them like this “<<FullName>>”.)

Repeat that process for each text field in your design that you want associated with data merge.
Preview The InDesign Data Merge Result
With your field associations in place, click the “Preview” toggle on the lower left corner of the data merge panel. Presto! You are now seeing live, spreadsheet data in your document! You can scroll through the various records to see and confirm the result of the merge.

Note that at this point, the pages panel still shows only one page:

Select “Create Merged Document” from the InDesign data merge panel:

You will see a popup with various options. For our purposes, skip the options and just click “Ok”:

InDesign creates a new document, identical to the one you started with, but with a new page for each record in your spreadsheet file, and all the variable text substituted in:

Dealing With Overset Text
When you create your merged document, you may get an overset text warning:

What that means is that one or more of the entries in your spreadsheet was too long to fit in the available text space in the document. Normally, we go in and adjust those by hand. It is easy to do, since each record is now on it’s own page in the merged document.

Also, remember that this process is non-destructive. If you don’t like the way your merged document came out, you can always go back to your original document, make adjustments, then try again.
Wrap Up
That’s how we handle variable text projects here at SpeedBinder. The resulting merged files are exported to high-resolution PDFs and sent to our printing workflow.
We’ve covered a lot of ground here. If you get stuck on anything, we’re always here to help. Shoot us an email at artwork@speedbinder.com or give us a call. We’re nice!